【零基础入门SpringBoot2】—— SpringBoot2入门
一、上手第一个程序
1、系统要求
此处以我自己使用的版本为例,在后期学习过程中遇到一些问题,我也会试着给出解决方案
- Java8
- Maven 3.6.3
- idea 2022.2.3
配置我们Maven的 setting.xml
指定了镜像源和使用的JDK版本
nexus-aliyun central Nexus aliyun http://maven.aliyun.com/nexus/content/groups/public jdk-1.8 true 1.8 1.8 1.8 1.8 2、HelloWorld
需求:通过浏览器发送 /hello请求,响应 Hello, Spring Boot 2! 到浏览器中
🌔 附上目录结构:
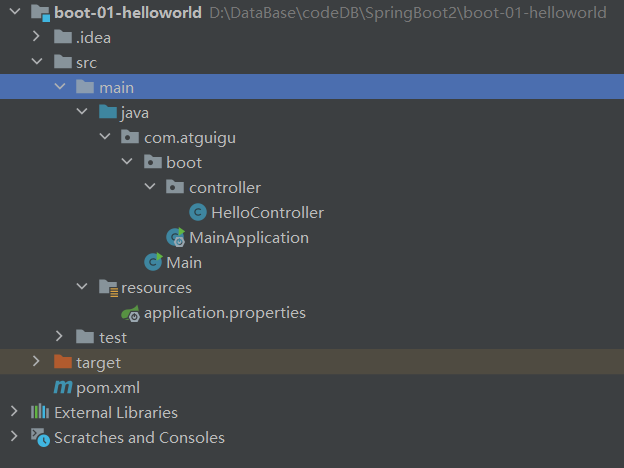
(1)步骤一:在IDEA 中创建好我们的工程,在pom.xml 添加依赖
org.springframework.boot spring-boot-starter-parent 2.3.4.RELEASE org.springframework.boot spring-boot-starter-web (2)步骤二:需要创建我们的主程序 【用来引导SpringBoot项目的启动】
package com.atguigu.boot;import org.springframework.boot.SpringApplication;
import org.springframework.boot.autoconfigure.SpringBootApplication;/*** @author Bonbons* @version 1.0* 这个SpringBootApplication注解的作用就是告诉SpringBoot,这是一个SpringBoot的应用* 被标记的这个类我们称为主程序类*/
@SpringBootApplication
public class MainApplication {public static void main(String[] args) {//运行主程序,将主程序类加载到内存中,并传递主程序的参数SpringApplication.run(MainApplication.class, args);}
}
(3)步骤三:编写业务,也就是处理请求的控制器
package com.atguigu.boot.controller;import org.springframework.stereotype.Controller;
import org.springframework.web.bind.annotation.RequestMapping;
import org.springframework.web.bind.annotation.ResponseBody;
import org.springframework.web.bind.annotation.RestController;/*** @author Bonbons* @version 1.0*/
@SuppressWarnings("ALL") //抑制警告
//@Controller //声明Bean(控制器)
//@ResponseBody //说明我们这个类里返回的字符串都是用来响应浏览器的,而不是用来跳转
@RestController //属于Controller+ResponseBody
public class HelloController {@RequestMapping("/hello") //请求映射public String hello(){return "Hello, String Boot 2!"; //响应数据}
}
(4)步骤四:运行main方法进行测试
如图所示测试成功
3、SpringBoot 简化操作
-
简化配置,我们在resources文件夹下创建一个 application.properties
- 用来设定任何与配置相关的内容
- 例如:我们想修改tomcat的端口号 【再次运行项目,需要在浏览器输入 localhost:8888/hello】
# 修改tomcat服务器端口号
server.port=8888
# SpringBoot相关的所有配置都防止在这个文件中,如果我们不主动更改,都会采取默认的配置
- 用来设定任何与配置相关的内容
-
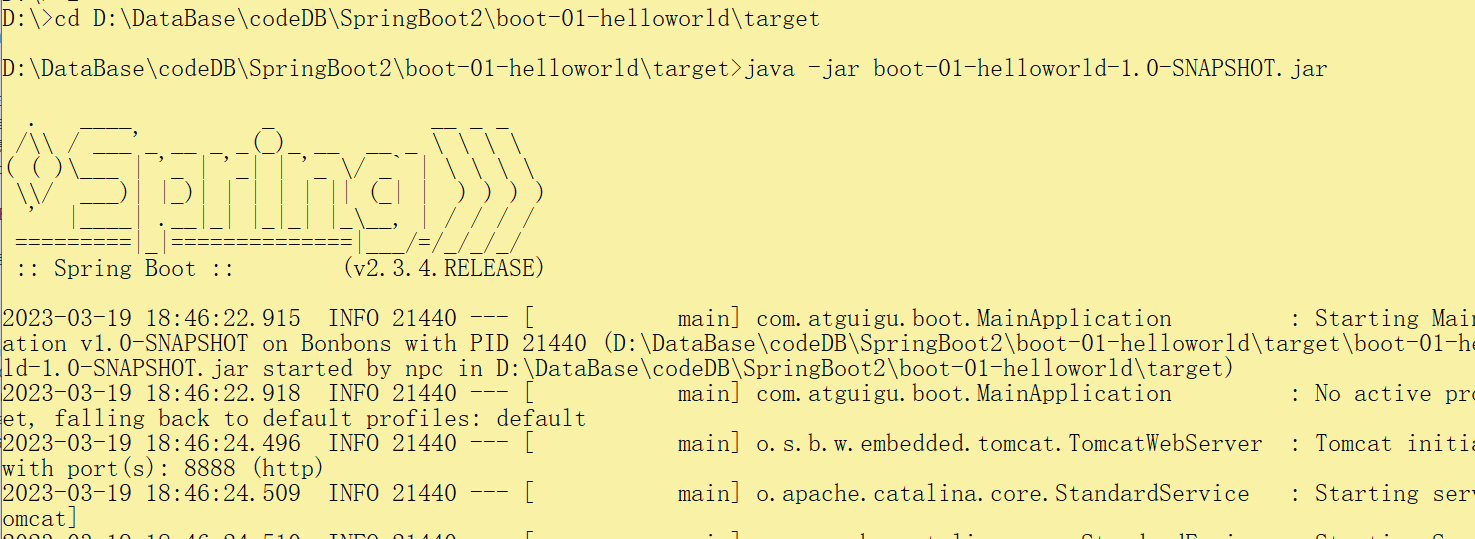
简化部署:在pom.xml 文件中添加一段配置,我们通过maven的 clean + package 打出来的 jar 包可以在DOS中直接运行
- 首先,进入在jar包所在的目录
- 运行 java -jar jar包名称就可以运行了
- 最好关闭控制台属性的快速编辑模式,以免在运行过程中点击到控制台导致项目运行失败
org.springframework.boot spring-boot-maven-plugin 二、SpringBoot的特点
1、依赖管理
- 在pom.xml中使用父项目做依赖管理
依赖管理
org.springframework.boot spring-boot-starter-parent 2.3.4.RELEASE
org.springframework.boot spring-boot-dependencies 2.3.4.RELEASE - 开发导入 starter 场景启动器
1、见到很多 spring-boot-starter-* : *就某种场景
2、只要引入starter,这个场景的所有常规需要的依赖我们都自动引入
3、SpringBoot所有支持的场景
https://docs.spring.io/spring-boot/docs/current/reference/html/using-spring-boot.html#using-boot-starter
4、见到的 *-spring-boot-starter: 第三方为我们提供的简化开发的场景启动器。
5、所有场景启动器最底层的依赖
org.springframework.boot spring-boot-starter 2.3.4.RELEASE compile
- 定位父项目的坐标标签,子项目可以直接继承父项目的依赖包,实现所有子项目共用相同的依赖包
- 所以引入依赖可以默认不写版本【自动仲裁】
- 引入非版本仲裁的jar,要写版本号
1、查看spring-boot-dependencies里面规定当前依赖的版本 用的 key。
2、在当前项目里面重写配置5.1.43
2、自动配置
- 自动配好Tomcat
- 引入Tomcat依赖
- 配置Tomcat
org.springframework.boot spring-boot-starter-tomcat 2.3.4.RELEASE compile -
自动配好 SpringMVC
- 引入SpringMVC 全套组件
- 自动配好SpringMVC常用组件
-
自动配好Web常见功能,如:字符编码问题
- SpringBoot 帮我们配置好了所有web开发的场景
-
默认的包结构:
-
主程序所在包及其下面的所有子包里面的组件会默认扫描出来【和MainApplication在一个包下】
-
无需以前的包扫描配置
-
想要改变扫描路径,
- @SpringBootApplication(scanBasePackages=“com.atguigu”)
- @ComponentScan 指定扫描路径
@SpringBootApplication
等同于
@SpringBootConfiguration
@EnableAutoConfiguration
@ComponentScan("com.atguigu.boot")
-
-
各种配置拥有默认值
- 默认配置最终都是映射到某个类,如:MultipartProperties
- 配置文件的值最终会绑定每个类上,这个类会在容器中创建对象
-
按需加载所有自动配置项
- 非常多的 starter
- 引入了哪些场景,这个场景的自动配置才会开启
- SpringBoot所有的自动配置功能都在 spring-boot-autoconfigure
三、容器功能
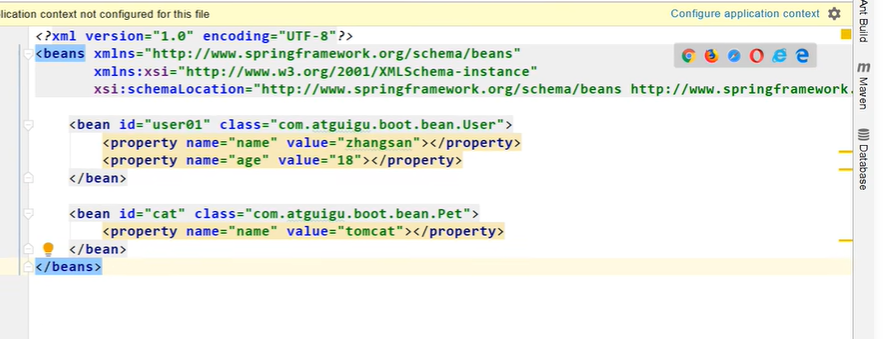
- 之前我们在SpringMVC中添加组件是通过编写spring.xml来完成的
-
那么在SpringBoot中,我们应该如何添加组件呢?
- 在SpringBoot中,为我们提供了@Configuration注解声明一个配置类,在配置类中通过@Bean注解标记一个方法,用于注册组件
- 组件名磨人为方法名,我们也可以指定方法名
- 对于@Configuration注解有一个属性我们需要了解, proxyBeanMethods代表是否开启代理机制
- 在SpringBoot中,为我们提供了@Configuration注解声明一个配置类,在配置类中通过@Bean注解标记一个方法,用于注册组件
-
配置类可以编写全模式和轻量级模式,就是通过proxyBeanMethods属性的设置
- 可以用于解决组件依赖问题,一个组件调用了另一个组件
- 如果为true,则就是在容器里找组件
- 如果为false,就是创建新的组件对象
- 可以用于解决组件依赖问题,一个组件调用了另一个组件
-
配置 类组件之间无依赖关系用Lite模式加速容器启动过程,减少判断
-
配置类组件之间有依赖关系,方法会被调用得到之前单实例组件,用Full模式
#############################Configuration使用示例######################################################
/*** 1、配置类里面使用@Bean标注在方法上给容器注册组件,默认也是单实例的* 2、配置类本身也是组件* 3、proxyBeanMethods:代理bean的方法*      Full(proxyBeanMethods = true)、【保证每个@Bean方法被调用多少次返回的组件都是单实例的】*      Lite(proxyBeanMethods = false)【每个@Bean方法被调用多少次返回的组件都是新创建的】*      组件依赖必须使用Full模式默认。其他默认是否Lite模式****/
@Configuration(proxyBeanMethods = false) //告诉SpringBoot这是一个配置类 == 配置文件
public class MyConfig {/*** Full:外部无论对配置类中的这个组件注册方法调用多少次获取的都是之前注册容器中的单实例对象* @return*/@Bean //给容器中添加组件。以方法名作为组件的id。返回类型就是组件类型。返回的值,就是组件在容器中的实例public User user01(){User zhangsan = new User("zhangsan", 18);//user组件依赖了Pet组件zhangsan.setPet(tomcatPet());return zhangsan;}@Bean("tom")public Pet tomcatPet(){return new Pet("tomcat");}
}################################@Configuration测试代码如下########################################
@SpringBootConfiguration
@EnableAutoConfiguration
@ComponentScan("com.atguigu.boot")
public class MainApplication {public static void main(String[] args) {//1、返回我们IOC容器ConfigurableApplicationContext run = SpringApplication.run(MainApplication.class, args);//2、查看容器里面的组件String[] names = run.getBeanDefinitionNames();for (String name : names) {System.out.println(name);}//3、从容器中获取组件Pet tom01 = run.getBean("tom", Pet.class);Pet tom02 = run.getBean("tom", Pet.class);System.out.println("组件:"+(tom01 == tom02));//4、com.atguigu.boot.config.MyConfig$$EnhancerBySpringCGLIB$$51f1e1ca@1654a892MyConfig bean = run.getBean(MyConfig.class);System.out.println(bean);//如果@Configuration(proxyBeanMethods = true)代理对象调用方法。SpringBoot总会检查这个组件是否在容器中有。//保持组件单实例User user = bean.user01();User user1 = bean.user01();System.out.println(user == user1);User user01 = run.getBean("user01", User.class);Pet tom = run.getBean("tom", Pet.class);System.out.println("用户的宠物:"+(user01.getPet() == tom));}
}
-
组件放在默认包扫描的范围内,之前的那些注解也能用
- @Componet、@Service、@Controller、@Repository
- @ComponentScan包扫描、@Import导入组件【可以用在任何配置类和组件中】
-
@Import注解的作用:导入指定类型的组件,自动调用指定组件的无参构造器创建指定组件的对象获取到的组件名字就是默认的全类名
-
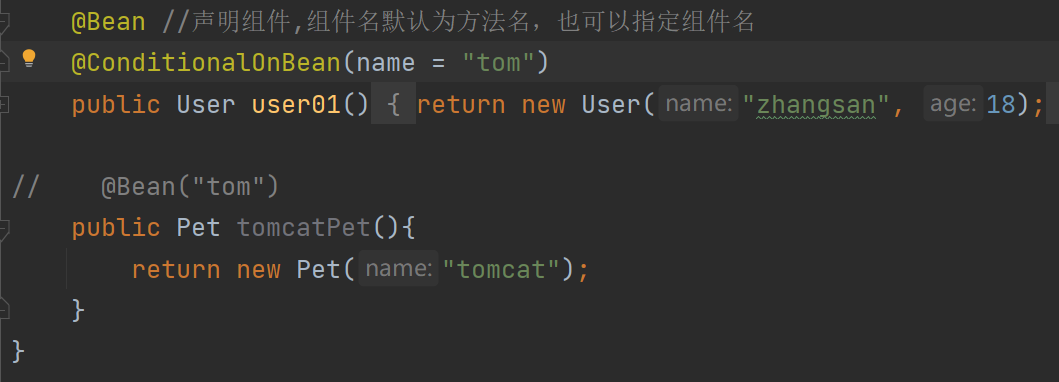
@Conditional:按照某些指定的条件进行装配 【条件装配】
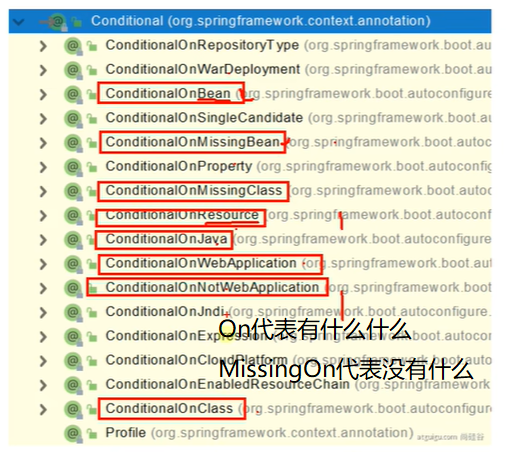


- 我们使用@Conditional注解的子注解 @ConditionalOnBean
- 只有容器中存在我们指定的这个注解,才会为我们注册这个组件
- @Conditional注解可以用在某个具体的组件上(方法),也可以用在配置类上(效果是对配置类中所有的组件都生效)

=====================测试条件装配==========================
@Configuration(proxyBeanMethods = false) //告诉SpringBoot这是一个配置类 == 配置文件
//@ConditionalOnBean(name = "tom")
@ConditionalOnMissingBean(name = "tom")
public class MyConfig {/*** Full:外部无论对配置类中的这个组件注册方法调用多少次获取的都是之前注册容器中的单实例对象* @return*/@Bean //给容器中添加组件。以方法名作为组件的id。返回类型就是组件类型。返回的值,就是组件在容器中的实例public User user01(){User zhangsan = new User("zhangsan", 18);//user组件依赖了Pet组件zhangsan.setPet(tomcatPet());return zhangsan;}@Bean("tom22")public Pet tomcatPet(){return new Pet("tomcat");}
}public static void main(String[] args) {//1、返回我们IOC容器ConfigurableApplicationContext run = SpringApplication.run(MainApplication.class, args);//2、查看容器里面的组件String[] names = run.getBeanDefinitionNames();for (String name : names) {System.out.println(name);}boolean tom = run.containsBean("tom");System.out.println("容器中Tom组件:"+tom);boolean user01 = run.containsBean("user01");System.out.println("容器中user01组件:"+user01);boolean tom22 = run.containsBean("tom22");System.out.println("容器中tom22组件:"+tom22);}
🌔 原生配置文件的导入
- 之前用bean.xml配置组件的一些信息,但是用springBoot不去配置就无法识别到这些组件的注册信息
- 如果我们已经有了bean.xml文件,而且不想转换成@Bean注解的方式注册,我们就可以是用@ImportResource注解导入我们这个配置文件
- 在resource包下为类路径下,所以我们可以这样写`@ImportResource(“classpath:bean.xml”)
🌔 配置绑定机制
-
配置绑定:
-
只有在容器中的组件,才能使用SpringBoot提供的强大功能
- 此处以配置绑定为例:
- 我们有一个Car类,然后在application.properties文件中进行了属性配置
- 例如:
zbc.carNo=123;zbc.carName=benchi,如果我们想对Car这个类使用配置绑定,就要将Car这个类上添加@Component注解,然后添加@ConfigurationProperties(prefix=“zbc”) //prefix 是前缀的意思
- 此处以配置绑定为例:
-
方式1:@Component + @ConfigurationProperties
-
方式2:@EnableConfigurationProperties【开启属性绑定】【适用于我们要用第三方设置的类】
- 这个注解用在我们配置类上,指定类.class;
- 我们在指定类上不用Component注解
- 只需要提供@ConfigurationProperties注解【为了将属性与配置对应起来】
- 对于@EnableConfigurationProperties注解有两个功能:
- 第一个为我们指定的类开启配置绑定功能
- 把指定的这个类作为组件自动注册到容器中
- 这个注解用在我们配置类上,指定类.class;
-
自动装配适用于容器中已经有的组件 @Autowire
四、自动配置原理入门
🌔 1、我们需要知道 @SpringBootApplication 注解标记一个主程序启动类,它是以下三个注解的组合
- SpringBootConfiguration 核心配置类
- ComponentScan(“com.atguigu.boot”)扫描包
- EnableAutoConfiguration注解是以下两个注解的合成
- @AutoConfigurationPackage 利用Registrar批量注册多个组件【就是将我们扫描包下的组件批量注册到容器中】
- @Import({AutoConfigurationImportSelector.class}):导入在配置文件中写死的127个组件【但是其中有些是不生效的】
- 通过我们的配置按需开启
- 先介绍了有些自动配置类会生效、有些自动配置类不会生效
🌔 2、banner图的两种配置方式:
- 将图片放到根路径下,并命名为 banner
- 通过
spring.banner.image.location=图片路径修改banner图
🌔 3、总结
- SpringBoot先加载所有的自动配置类 xxxxxAutoConfiguration
- 每个自动配置类按照条件进行生效,默认都会绑定配置文件指定的值。xxxxProperties里面拿。xxxProperties和配置文件进行了绑定
- 生效的配置类就会给容器中装配很多组件
- 只要容器中有这些组件,相当于这些功能就有了
- 定制化配置
○ 用户直接自己@Bean替换底层的组件
○ 用户去看这个组件是获取的配置文件什么值就去修改。
xxxxxAutoConfiguration —> 组件 —> xxxxProperties里面拿值 ----> application.properties
🌔 4、最佳实践
- 引入场景依赖
○ https://docs.spring.io/spring-boot/docs/current/reference/html/using-spring-boot.html#using-boot-starter - 查看自动配置了哪些(选做)
○ 自己分析,引入场景对应的自动配置一般都生效了
○ 配置文件中debug=true开启自动配置报告。Negative(不生效)\Positive(生效) - 是否需要修改
○ 参照文档修改配置项
■ https://docs.spring.io/spring-boot/docs/current/reference/html/appendix-application-properties.html#common-application-properties
■ 自己分析。xxxxProperties绑定了配置文件的哪些。
○ 自定义加入或者替换组件
■ @Bean、@Component。。。
○ 自定义器 XXXXXCustomizer
五、开发小技巧
🌔 1、使用Lombok简化开发
- 我们在Plugin下载Lombok插件,然后引入相关依赖,在我们的pojo类上使用@Data注解;就可以不用为私有属性提供get/set方法
- 添加@ToString注解,就相当添加了toString方法
- @AllArgsConstructor 全餐构造器
- @NoArgsConstructor 无参构造器
- @EqualsAndHashCode 重写HashCode
- @Slf4j 引入日志,可以将打印到控制台的内容添加到日志中
org.projectlombok lombok ===============================简化JavaBean开发===================================
@NoArgsConstructor
//@AllArgsConstructor
@Data
@ToString
@EqualsAndHashCode
public class User {private String name;private Integer age;private Pet pet;public User(String name,Integer age){this.name = name;this.age = age;}}================================简化日志开发===================================
@Slf4j
@RestController
public class HelloController {@RequestMapping("/hello")public String handle01(@RequestParam("name") String name){log.info("请求进来了....");return "Hello, Spring Boot 2!"+"你好:"+name;}
}
🌔 2、dev-tools
- 引入依赖后,在堆项目修改后,想要更新项目信息,只需要按Ctrl + F9
org.springframework.boot spring-boot-devtools true 🌔 3、Spring Initailizr
- 可以用于项目初始化向导,我们根据需求进行选择,会自动为我们进行导入依赖
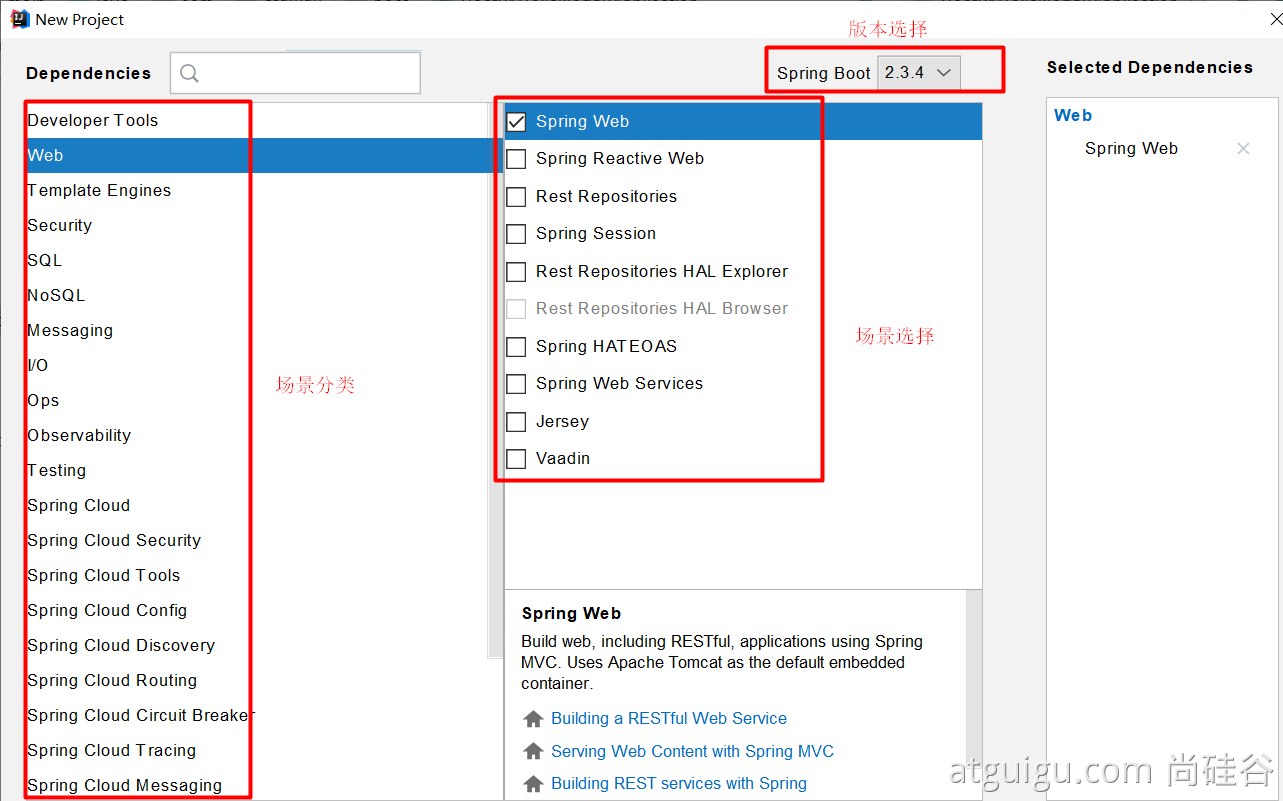
- 主要包含三个功能
- 自动依赖导入
- 自动创建项目结构
- 自动编写好主配置类

